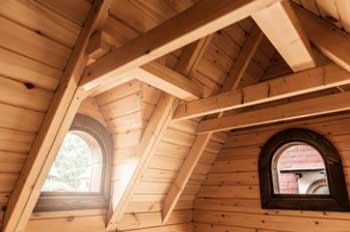
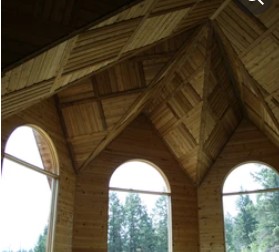
Would you like to add a beautiful, durable finish to your new knotty pine ceiling? There are a lot of knots, tall tongues, and sometimes valleys in the wood of a knotty pine ceiling that could be improved with a topcoat.
If you’re finishing your own knotty pine ceiling you might be intimidated by the difficulty level or think that you won’t be able to find the best knotty pine ceiling finish for your project.
The fact is that you can successfully finish any type of knotty pine yourself if you have the right information. The best finish for knotty pine is varnish or polyurethane, but there are other options for different looks and projects.
Lots of people prefer knotty pine paneling better than tongue and groove pine ceilings because of the cost savings.
Choosing the best clear finish for knotty pine ceiling is highly dependent upon the color of the finish that you prefer. After you have determined your favorite color, then it will all be about choosing the best clear finish for knotty pine ceiling so that you can take full advantage of what these solid, natural woods have to offer.
What Do You Finish Knotty Pine With?
Mauro used 150-grit sandpaper to rough up the pine’s surface and reveal the wood’s pores. After that, he used a tack cloth to clean up the sawdust.
For the best results, apply a thin layer of Zar Country White oil-based stain with a natural-bristle brush and let it sit for two to three minutes so it can soak into the wood. Clean a rag and rub the stain out in the direction of the wood grain.
if you want the finish to have a brighter and whiter appearance. Apply two coats of a water-based acrylic finish using a brush with synthetic bristles and working in circular motions. The same thing would happen if you used Minwax’s Polycrylic Protective Finish.
Best Clear Finish For Knotty Pine Ceiling
Finding the best Clear finish for a knotty pine ceiling is really quite simple once you understand how to pick a finish. Varnish and Polycrylic provide a very durable, high-gloss finish that will last as long as your wood.
1. Clear Polycrylic Water-Based Protective Finish Satin By Minwax

Minwax Clear Polycrylic Protective Finish is a water-repellent durable finish for finished wood surfaces. Provides maximum protection and durability in one easy step. The crystal-clear protective coating protects against scratches, scuffs and blemishes to protect your wood surface beneath. For interior projects like furniture, cabinets, doors and paneling.
Guard The Surfaces Of Wood
Minwax Polycrylic Protective Finish will protect and improve the look of your interior woodworking projects, such as furniture, doors, cabinets, and other woodwork. The clear coat helps keep things like scratches, stains, and dirt from hurting the car.
Finish That’s Crystal Clear
This protective finish coating has a crystal-clear finish that works well on oak, walnut, cedar, and birch, as well as over Minwax’s water-based stains. It comes in a spray can, which makes it easy to use. You can also choose from different sheens.
Satin Sheen
Your woodworking projects will look polished if you use this satin clear varnish on them. Not only does it keep the wood’s natural beauty, but it also gives the surface an attractive and traditional sheen, making it look classy and understated. It doesn’t turn yellow or amber, and it smells light.
Ultra-Fast Drying
Use this polycrylic coating to make your equipment work better and keep it safe. This clear coat dries quickly, so you can put it on again quickly even after two hours. This lets you finish projects more quickly. When you put the product on, you should always use a brush with high-quality synthetic bristles.
Easy Clean-Up
This wood finish is water-based, so spills and big messes are easy to clean up with soap and water, so you don’t have to worry about them.
Pros
- Protect Your Wood Projects.
- Long-Lasting Wood Finishes.
- Fast-Drying Clear Coat.
- Easy-Clean Finishes.
Cons
- This is a small jar.
2. Premium Golden Teak Oil By Star Brite

Star Brite Premium Golden Teak Oil is designed for marine and outdoor use. This formula uses advanced tung oil polymers to provide maximum protection for teak and other fine woods, including pressure-treated lumber and trees. It contains UV absorbers to protect against sun damage, weathering, fading and discoloring. Star Brite Teak Oil is a fast drying oil that gives teak a natural, long-lasting warm golden color made with pride in the USA.
How Long Does Star Brite Teak Oil Take To Dry?
After that, give it enough time to dry completely (typically around 24 hours), and then check to see whether a second coat is required. There are situations when one coat is sufficient, but typically two coats are required to achieve the desired hue.
How Do You Use Star Brite Teak Oil?
If you pick up a bottle of Star brite’s one-step Teak Cleaner and Brightener you’ll be able to save time by combining the process of cleaning and brightening the wood. Make sure you’re wearing gloves for protection and follow the instructions on the bottle. If your wood is badly weathered or very dirty, then apply the cleaner directly to dry wood. Spread it around with a scrub brush and then give it a few minutes to work. Scrub again and rinse clean.
What Is The Difference Between Teak Oil And Teak Sealer?
Teak Sealers are different from Teak oils because they do not “feed” the wood with additional oils or resins. This sets them apart. They instead act as a barrier, preventing moisture and pollutants from damaging the wood while also preserving the natural oils and resins that are already present in the material. Sealer does, however, require reapplication nearly as frequently as oil does.
Pros
- UV Absorbers for your Paint.
- Natural-looking golden wood.
- wood protection and shine.
- Easy to use wood stain.
Cons
- Good product but not a competitive price.
3. DiamondFInish Clear Coat By KBS
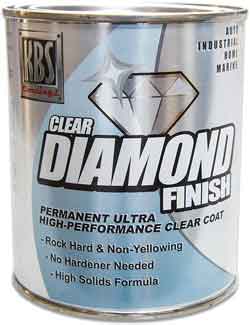
KBS DiamondFinish Clear Coat is a tough, water-clear, high-gloss clear coat that is used for Metal Finishing. This product can be used directly on metal or on top of other coatings to make an extremely high-gloss finish that lasts a long time. Our clear coat is always flexible and can work in the harshest conditions without yellowing, cracking, or peeling. It provides excellent resistance to chemicals when they are used in a recommended manner and application rates.
Fiberglass and Gelcoat Restoration
DiamondFinish Clear is an ideal clear coat for restoring the shine to a gel coat that has chalked and faded. It adds protection, enhances gloss and provides a shorter wet-dry time than other clear coats. DiamondFinish Clear is best suited for craftsmen and hobbyists looking for a high-end, economical product that gets the job done without all the hype.
Direct To Metal Application
KBS Coatings is a product line created for direct-to-metal applications requiring no additives for improved adhesion and wear performance. This innovative technology can be used as part of either a full-service paint process or as a stand-alone system.
Directly Apply to Painted Surfaces
This Coating is a high-quality low odor solvent-based clear coat designed to be applied directly to painted surfaces. Due to its fast drying time, it can be recoated in half or less than the number of hours required by other clear coats.
Pros
- High gloss clear coat.
- Guaranteed no warping.
- Single part harder.
- No brush marks.
Cons
- Not easy to store.
4. Rust-Oleum Ultra Matte Chalked Paint
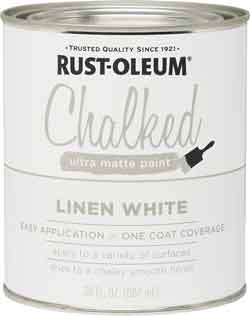
Create a distressed look on a variety of interior surfaces like wood, metal, ceramic, canvas and more using Rust-Oleum Chalked Ultra Matte Paint. A latex formula that is low-odor and easy to clean up with soap and water creates an authentic aged appearance. This latex chalk paint dries to the touch in just 30 minutes for easy application and one-coat coverage. Use it on a variety of projects, such as furniture accents or home decors projects like decorative wall art or kitchen backsplash.
Clear And Prepare
Before you dry it, use soap and water to get rid of any attachments. Use sandpaper to rough up any shiny spots so the paint will stick. Primers aren’t needed on most surfaces, but you should use them before painting or staining bare wood and woods with a high tannin content, like redwood, mahogany, and fir.
Brush On
After priming, you’ll have to wait two hours before you can use the finish. If a color has settled, stir it very hard to move it around again. Use a good synthetic brush and make light, smooth strokes when you paint. If you want to put on more than one coat, wait at least two hours between each one.
Coat of Finishing
For best results, wait at least 8 hours before putting on the topcoat. Because of this, you will be much safer. Apply one to two even, thin coats, waiting two hours between each coat.
Pros
- No prep, easy application.
- Dries to the Touch in 30 Mins.
- Save money on painting.
- Easy clean-up.
Cons
- Packaging is an issue.
5. Varathane Water Based Ultimate Polyurethane
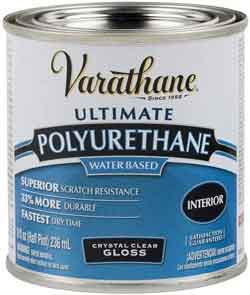
Varathane Water Based Ultimate Polyurethane is a clear coating that protects wood surfaces inside your home. Using Varathane Ultimate saves you time, and hassle and eliminates the need for sanding. When it dries, it leaves a high-gloss finish that enhances the natural beauty of your wood creations. It is great for indoor projects like cabinets, tables and frames because it doesn’t yellow over time and can be easily recoated with either Varathane or another water-based finish in just one hour.
Protects indoor wood surfaces
Suitable for use on many wood surfaces, including furniture, windows, cabinets, trim and more. Protects against stains and moisture damage. The thick brushable formula provides a rich and durable finish that dries clear, dries fast and resists yellowing.
Dries Fast And Cleans Up
This water-based formula dries fast and cleans up with soap and water. It’s excellent for interior woodwork, cabinets, doors and furniture. It also has excellent water resistance for exterior applications.
Stain And Scratch Resistance
This water-based polyurethane creates a tough, durable finish that resists scratches and stains. Ideal for use on fine woods and most other flat substrates, this high-performance coating offers excellent clarity and can be applied over virtually any interior or exterior surface to protect against moisture, mildew, UV rays, scuffing and abrasion.
Pros
- Dry to Touch in 30 mins.
- Outstanding stain resistance.
- Clean and Finished Look.
- Scratch and Stain Protection.
Cons
- lid is not on properly.
How Do You Give A Smooth Knotty Pine Natural Finish

Smooth and make the surface smooth by sanding the knots. Lightly sanding with 240-grit paper is best if you are going to paint your job. If you want a glossy look, use 320-grit sandpaper to remove any raised grain. Always work in one direction with lightweight strokes until the desired result is achieved. When you have completed all of these steps, your project will be ready for its final coat of finish.
How To Finish Knotty Pine Ceiling
Using a 4-inch paintbrush, apply an oil-based stain to the wood, following the grain of the wood. This can be done with either an oil-based or water-based stain, as both will penetrate deep into the knotty pine. Apply a thin coat of stain by first applying it to a section about 2 square feet at a time. Brush along the grain of the wood using a back and forth motion.
How To Remove Paint From Knotty Pine Paneling?
- After drop cloths or plastic sheets have been used to cover the furniture and floors, painter’s tape should be placed on the trim and molding.
- Using a brush, apply a heavy coat of paint stripper to the paneling. Apply paint stripper to the paneling and let it sit for 15 to 20 minutes, or until the paint starts to bubble.
- Scrape off as much of the paint that has become flexible as you can using a putty knife. Carry on with these processes until all of the old polyurethane has been removed off the panels.
Buying Guide
Before you spend money on a finish for knotty pine ceilings, you need to make sure a few things are right. This will make sure your work is worth it and keep you from throwing away money. These are the most important things to think about before making a final choice.
Color
When it comes to finishing Knotty, you won’t be able to choose any color you want. Choose a color that not only matches your style but also looks great with the rest of your home’s decor.
Also, pick a color that gives guests the kind of good first impression you want them to have of your home when they leave. You can get ideas for your color palette from home décor magazines or from home contractors who can help you choose the right colors for your space.
Once you know what you’re doing and have decided whether you want to hide the natural beauty of the wood or keep it, you can choose a color that fits your tastes and goes with what you’re doing.
Time It Took To Dry
Before you spend any money on a finish for pine, make sure to think about how long it will take to dry and cure. Drying time is the amount of time that must pass between the coats of a product.
It is also called “recoat time” from time to time. The amount of time you should wait before using your finished projects as you normally would is called the cure time.
Be aware that the drying time will depend on the temperature and humidity, how you apply it, and whether you are working with bare wood or wood that has already been stained.
How quickly or slowly you can finish your project and move on to other things will depend on how long it takes for the finish to dry. Ones that are made with water dry faster than ones that are made with oil.
Durability
It is a way to figure out how long the finish will last before it needs to be touched up. In general, products that are made from oil last longer than those that are made from water.
On the other hand, there are water-based products on the market that are of high quality and last longer than anything else. Even though they cost more, they are better for the environment, have no smell, and dry much faster.
Look back on Knotty Pine
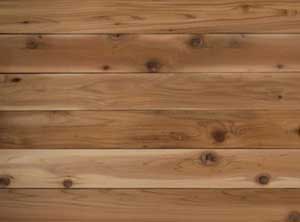
Knotty pine is a very popular natural wood that is known for having a bulging texture with lots of knots and very coarse grain. The name comes from the way the trees grow, as the grain often knots together and interlocks with other pieces of wood. The wood originated on the east coast of North America and primarily that was Canada and the Northern United States. By now, you’ve probably heard all you need to know about this type of wood. But there are still many factors to be considered when choosing the best finish knotty pine ceiling.
FAQ
Does Knotty Pine Need To Be Sealed?
The hardest part of working with pine is getting rid of the knots. Pine has a thick sap that can keep dripping out of the knots for years. If the knots aren’t sealed, the sap will eventually get out and ruin the finish or paint if nothing is done to stop it.
Do You Have To Seal Tongue And Groove Ceiling?
There are people out there who want to paint their tongue-and-groove ceilings. If you do it this way, you’ll need to use shellac to fill in any knots in the wood before you can prime or paint it. If you don’t do this, the sap in the knots will leak through the paint and ruin the job.
How Many Coats Of Polyurethane Should A Pine Ceiling Have?
For the finest results, apply three or four coats in total. Because this polyurethane takes longer to cure, you’ll have to wait a lengthy period between layers. Regardless of how many coats of oil-based finish you apply, the process of applying polyurethane will always be time-consuming.
Can You Leave Tongue And Groove Ceiling Unfinished?
The knotty pine paneling with a solid tongue and groove is quite gorgeous. Nevertheless, abandoning it in its unfinished state is not a sound plan. If it is not completed, it will, over time, pick up dirt and pollutants from heating and cooking, which will make its natural glow less warm and inviting. You must have to seal it if you want to keep its appearance intact.
Conclusion
In the end, though, the best clear finish for a knotty pine ceiling depends on what you’re looking for out of it. If you’re primarily interested in a natural look, you might want to consider simply oiling the wood with a finishing wax. Waterborne finishes may prove difficult to clean up later, but they will likely offer more protective qualities so if your main goal is to prevent damage to the wood and keep it looking nice, it’s likely worthwhile. More than anything else, though, your choice between these two options should depend on individual preference. Choose the waterborne finish or oiled wood based on what looks best to your eyes. If the latter seems right for your room, then go with it. It probably won’t let you down.